Tuesday, March 31, 2009

Tinkerbell party II

A few rolls of crepe paper go a long way and are always impressive (especially to a group of 4-5 year olds).

I used lots of the ideas that people suggested a while ago. We had the Queen of the Fairies visit our party and grant each girl a 'talent'. She and Minnie had special wings that we made together. For each girl, we made a no-sew tutu that they got to take home with them. They're surprisingly easy and inexpensive, check out the video tutorial here.

I keep trying to find good pictures of her cute wings but these are all I have. Oh well, the party was a hit and we had tons of fun. Thanks everyone who came!


Monday, March 30, 2009

Birthday cake

Minnie wanted a Tinkerbell party for her birthday this year.

Frosting-from-a-can is never what you want to decorate a cake with. Buttercream icing is easy to make, colors well and it holds crisp edges when it dries. These drop flowers look fancy but are actually fairly easy. Wilton has some great cake-decorating instructions online with pretty much every technique you could possibly want. And if you were wondering, the Tink charm is hanging from a piece of bent coat hanger that I covered with frosting after it was in place.

Friday, March 27, 2009

Photoshop Friday - black & white

Any photo-editing program can turn any digital image black and white, but with Photoshop you can enhance the original image to get a really great picture.

First, start with a picture that has good contrast between the background and subject. If your person has dark hair and is sitting in front of a dark leafy tree, their hair will just disappear into the background and it won't be the greatest picture. The same goes for really busy backgrounds - they will just look muddy. And some pictures just plain look better in color! So picking the right picture to turn B&W is important.


This picture will look great in B&W, the girl's hair stands out from the darker background and her eyes have a nice sparkle. Before I turn it B&W though, I'm going to pump up the contrast a bit more. We'll do this in Image -> Adjustments -> Levels


Mess around with the sliders until things are kind of hyper-contrasted. We talked about the features of Levels on a previous Photoshop Friday, if you want to review. Remember, you can always back up and start over if you don't like the results. You might even find a color version of the picture that you like better than the original. But nothing is permanent (just make sure you don't save over your master file!)

I usually bring the middle arrow up (to the left) and the left arrow back towards the middle. Beware the right arrow - you can really blow out your white areas and make the picture look 'hot'.

When that is done, I see what Image -> Adjustments -> Brightness/Contrast can do for me. Again, play around with the slider arrows to see what happens.


At this point the picture is going to look hyper-colored and usually not so great. But stay with me!

Not all versions of Photoshop have a black-and-white feature. Never fear! If there isn't a Black and White command in the Image -> Adjustments tab, click Hue/Saturation


Take the slider for Saturation all the way down (left). VoilĂ !


Just so you'll see what the original picture would have looked like if you had simply run a regular black&white command on it.


Thursday, March 26, 2009

We're getting to the fun part!

Finally we're getting close to the end of this big job. I still have the kitchen to paint and (shudder) the floor to think about... but progress has been made!

I've had my eye on the same style of kitchen table for a few years now. I'm content to shop around for stuff like this forever because there's no way I'm springing for a table that costs more than several cars we've owned. My requirements were:
- a wood top with lacquered black legs.
- big enough to seat 7 (4 chairs and a bench)
- have an additional leaf for large dinners.

Whenever I would see an advertised 'good deal' on a table, I would go to the store to find that the actual table was 18 inches wide and would seat 7 people only if they were Oompa Loompas. However, I did finally find the exact table I wanted for almost the smaller amount of money that I was willing to pay.

And to match the black legs of our table, I sprayed the legs of the kids table so they could have their own matching dining table. Hooray!

Bookcase

Here's the used-to-be hallway, which is now a built-in bookcase! The carpentry work was done by our friend Devin and was definitely something that was best left to the experts.

Wednesday, March 25, 2009

Popcorn balls

My sister-in-law came over one evening and we had fun putting these together. The recipe is fairly simple and they are delicious! Because you have to boil sugar, this is definitely not a kid-friendly cooking project. Even though we were careful, I did manage to get a pretty good burn from the hot syrup. So keep those toddlers away until everything has cooled.

Caramel Corn Balls
6 cups popcorn (you can pop the kernels in hot oil or you can do what we did - pop 3 bags of low-salt, low-butter microwave popcorn. Open the bag a tiny bit and shake it upside down and let all the kernels out before you pour out the popcorn)

1/2 cup butter
2 cups packed light brown sugar
1 cup light corn syrup
1 8oz. can sweetened condensed milk
1 teaspoon vanilla extract

In a medium saucepan combine butter, sugar, and corn syrup. Stir well and bring to boiling over medium heat. Stir in condensed milk; simmer, stirring constantly, until thermometer reads 240 degrees F. Stir in vanilla.

Pour over popcorn and stir to coat. Place popcorn on a sheet of wax paper and use the paper to form the candy corn into a loosely-packed ball.

We put salted almonds into half of the popcorn balls and that was also delicious. You could stir in other yummy things, like butterscotch chips or MnM's.

Tuesday, March 24, 2009

Baby shower invite


My friend Jami is expecting a baby girl within a week and we had a shower for her over the weekend. This is the cute invite that we sent out.

If you need digital or printed invitations for any event (birthday, shower, etc) please contact me! jerilynphoto {at} gmail {dot} com

Monday, March 23, 2009

Hired help

Still trying to get the most noticeable of the words off the wall. This method was definitely the easiest I've tried so far.

Thursday, March 19, 2009

I'm annoyed with Sherwin Williams

In spite of all their claims to have excellent paint, I'm still having problems with the words 'bum' and 'panda' showing through on my walls. I've rolled on no less than 1 coat of primer and 4 additional coats of paint and I can still see words! Also I can still see where all the electrical switches have been edged.

The store will be hearing from me this weekend.

In additional news, we continue to make progress with our home-alteration. You may remember this hallway...

...which is now a rad broom/vacuum closet. You can never have too much storage space. I'm hoping that other in-the-way things can now live in this lovely closet, like my huge stock pot that has never fit in any cupboard we have ever owned.

With the one major exception, the painting is coming along nicely. I hope to get all the pictures hung before this weekend. And, even though you wouldn't believe it from this picture, you can now walk more than 2 feet in any direction without tripping. Unless you fall in the gaping hole in the carpet where the wall used to be. I'm considering turning it into a moat. Complete with moat monster of course.

Friday, March 13, 2009

Learn from my mistakes

If you should find yourself in this situation, don't ever NEVER write words in paint for your 4-year-old to sound out as you're edging the ceilings and door frames. It may seem like a good idea. It may keep her entertained for long periods of time. You may even congratulate yourself on approaching the reading thing in an unorthodox manner. However...

When all the paint dries, and the light hits it just right, you may find that you can still read the word 'bum' faintly on the wall.

Oh yeah, the sheet rock is done. Looks good, eh?

Wednesday, March 11, 2009

Why some things are better left to the professionals

Because then you get to spend a day feeling like you live in a HAZMAT scrub-down zone. Hooray!

What's really going on here is the sanding and spray-texture that finishes up the sheet rock work. Instead of having a gaping hole in between the two rooms, now we have one seamless surface. The last step is the gigantic trench in the carpet. I'm working on a temporary drawbridge to span the gap, but hopefully soon we'll be getting new floors and that will solve the problem. Keep your fingers crossed!

Tuesday, March 10, 2009

I have a headache...

... and my bottle of Advil got sucked up in the Shop Vac along with 12 metric tons of plaster and wallpaper shreds. Have not remembered to pick up another bottle at Buy-n-Large when I sent Joe there twice yesterday and once today.

The real reason for this not-post is that I spent a big part of today filming a video tutorial for a beaded watch. I'm equal parts excited/nervous to see the results. If it's not terrible, I'll post the link here in a week or so.

Monday, March 9, 2009

Earring winner

Instead of the normal/boring random integer generator for the winner, I used something even more random. I had Minnie pick her favorite number. She picked

number 1!

So Hannah, you are the winner of the earrings. Congrats girl!

Friday, March 6, 2009

Photoshop Friday - Cropping

Even though I'm on vacation, you STILL get Photoshop Friday. That's how much I love you.

I think there's two important reasons to crop your pictures. First to focus more on your subject and cut out any distracting background elements. Second to compose a good picture (something that's not always possible when you're actually taking the picture - especially with fast-moving kids!)

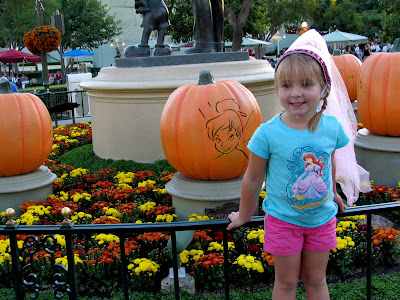
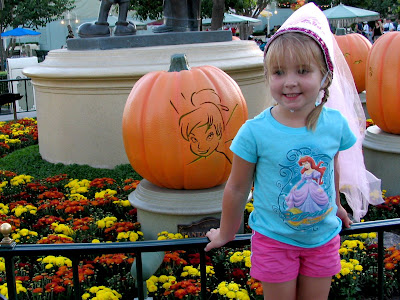
With this picture, I just want to close in tighter on Minnie and her pumpkin while cutting out some of the crowd and background... stuff.


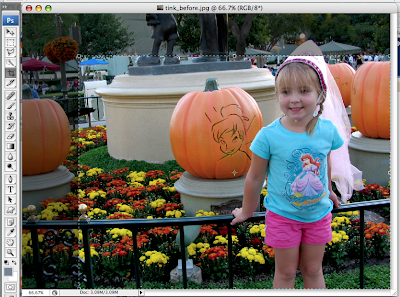
Choose your crop tool, which is that funny square thing. If you're going to have your pictures as prints later, you might want to preserve the aspect ratio of the original picture (if you crop it to a square and then try to make a print from it, the photo lab will chop the top and bottom off to make a 4x6 photo print.) To do this, select the entire image with your crop tool. A dotted line with the little adjust-a-box things will appear around your photo. Now holding down the Shift key, adjust just the corner boxes. You'll see that the ratio of length-to-height remains the same. Magic!

If you accidentally hit enter and crop something wrong, Cmmd/Cntl-Z will undo it and you can start over.

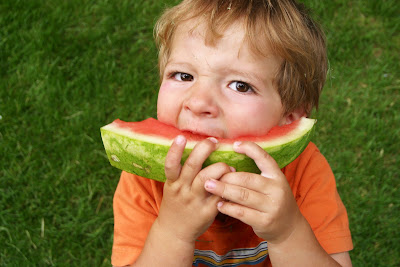
When you crop pictures, it's OK to cut off edges of your picture. Yes - even if it's a person. In this picture, I'm focusing on the watermelon and the expression on his face. It's ok to nip off the top of his head. You don't even miss it. ;)

OK, let's talk about composition. Photography revolves around the Rule of Thirds. Each picture is broken up into thirds in each direction, like this:

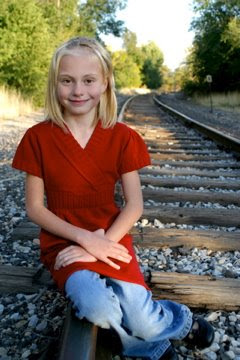
So instead of having your subject in the exact center of every picture, it's more pleasing to line them up along one of the lines. Upper, lower, left, right... it doesn't matter. And even if you didn't take the picture like this originally, you can still crop it according to the RoT afterwards!

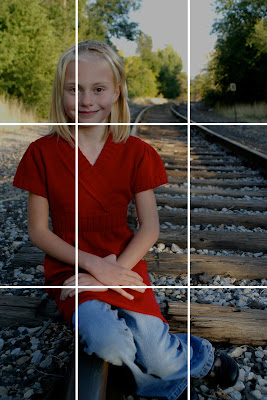
This way the picture feels composed, rather than just a snapshot.

One final note with the rule of thirds: if your subject is moving make sure they have somewhere to go. If Little Man were running off the edge of the picture, it would feel unbalanced. In your mind, the subject is moving and it wants to see where he's heading.


That's about it for picture-cropping and I hope this was helpful. Remember, if you have questions or topics you'd like to see for future Photoshop Fridays, tell me in the comments.

Thursday, March 5, 2009

It's almost here...

Look at these little beauties poking up out of the ground. Spring is just around the corner...

**I hear there's snow back home today! Bwahahaha! It's sunny and warm here. Also my cool necklace looked awesome with a grey dress and turquoise wedges at the awards dinner last night. Except that instead of being fairly casual, I was almost the most dressed-up person there. Turns out that when the Rural Water Association people get gussied up, it involves wearing your nicest, bluest, high-waistedest jeans and your most floral sweatshirt. So.... yeah.

Wednesday, March 4, 2009

Earring giveaway

Am currently headed to a warmer clime. Will be doing much basking-in-the-sunshine. Also on my to-do list while I'm there is an awards dinner/concert that Joe is attending through his work. To spruce up a dress that I already have, I got a new necklace that I love. But it also came with a pair of earrings. I never wear earrings. I look sort of silly in them and Bart pulls on them anyway.

Instead of throwing them away, I'm offering them as sort of a blog giveaway. I love to make earrings too - so maybe this will turn into a re-occurring thing.

OK, to win these cute-as-cute earrings, leave a post on this blog between now and Saturday. Tell me why you love these earrings/this blog/me. Haha. Only one entry per person please. I'll post the winner on Monday. Happy commenting!

Tuesday, March 3, 2009

I have skills

With the wallpaper down the kitchen looks much better. After a trip to Home Depot with my sister-in-law, I decided that a tiled backsplash would be inexpensive, easy and just what my kitchen needed.

If you didn't know this before, I have a Bachelor's degree in Geology. Does it come in handy, 8 years later? Not so much. Unless you count all the amazing dinosaur facts I can relate to my children when we visit the museum. One part of my education did actually have a practical application though - I can use a wet saw! And not kill myself! So I felt totally confident tackling this project almost-on-my-own.

I decided on this travertine-like ceramic with bronze accent tiles (the real travertine was beautiful but 3x the money and more porous - I thought it might be harder to clean). These 2-inch tiles come in 12x12" pre-spaced sheets that are oh-so-easy to put on the wall.

So go ahead and excuse the picture of my rear end. Joe thought it was funny that I was hanging off the counter trying to press all the tiles into the thin-set. Plus it's proof that I did the majority of this work my very very own self.

Remember the before? Fabulous cornflower blue and petal-pink vinyl wallpaper?


And...


Tada!!


Monday, March 2, 2009

My attempt to take control

When the electrician you've hired turns out be incompetent and walks off the job and your house is degraded to 80% power, what do you do?

You call your mom and cry of course. This is generally the #1 recommended solution. She will say consoling things and verbally abuse the electrician and offer to make you soup and you will feel better.

What you should probably NOT do in this case, however, is to wander around the kitchen while talking on the phone, start picking the edges of the wallpaper and, in your frustration, rip it down in large sheets. Because it will just get you into an even bigger project.

Also note that I shaved Bart's head. Because I had turned insane.

Have no fear though - Joe solved the electrical problems and the house is restored to full power. Also thanks to the help of my two wallpaper-removing monkeys, this project has a happier conclusion than the first one. I'm considering putting them up for hire (at an exorbitant fee of course). Seriously, give Bart a squirt bottle and Lisa a spatula and you have the Tag Team Duo of Wallpaper Destruction. They did an excellent job.